
In an more and more digital age, it’s wonderful what our telephones can do. These little devices not solely have unbelievable capability for all of our pictures, texts, calls and social media apps, however the cameras aren't any joke, both. The truth is, the newest iPhones, the iPhone 13 Professional and 13 Professional Max, have a 12-megapixel digicam system with three cameras, all within the palm of your hand.
You now not want a clunky Nikon or Canon digicam to create some spectacular work.
For those who don’t know the place to begin, although, you’re undoubtedly not alone. Simply because you've got fancy cameras and settings hooked up to your iPhone doesn’t imply it’s a breeze to know how they work and put them in motion. Under, you’ll discover ideas and methods you are able to do with a fingertip contact (or two).
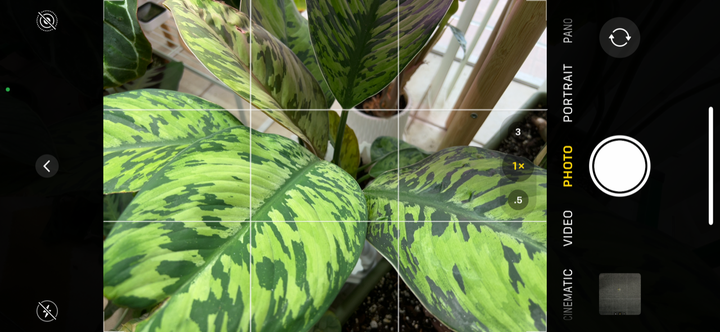
1. Activate the grid in your viewfinder
In accordance with Greg McMillan, a longtime “iPhoneographer” and host of “The iPhoneography Podcast,” having the grid setting turned on is without doubt one of the most necessary instruments for making a balanced picture.
“I all the time have this turned on as a result of it helps me hold the digicam degree, so I don’t have a crooked picture,” McMillan mentioned. “I’m a agency believer in having a degree horizon in my pictures.”
That is an choice it's a must to swap on in your iPhone’s Settings app. Scroll right down to Digital camera, then, within the Composition part, flip the grid toggle on.
“The grid is a superb instrument to assist with composition,” McMillan famous. The composition is basically a flowery phrase for the way you prepare the weather of the picture that your eye shall be drawn to. The grid choice will break up the digicam view into thirds, each vertically and horizontally.
Jane Goodrich, head of Picsello, a images enterprise model, really helpful remembering the rule of thirds, which holds that when a photograph is split evenly into horizontal and vertical thirds, topics look greatest when positioned on the intersection of the dividing strains.
“Every spot the place the strains intersect is the place you'll wish to place your topic inside the body,” McMillan mentioned, noting that this in the end creates a extra aesthetically pleasing picture.
2. Faucet to set focus and publicity (and lock it, too)
McMillan defined that the main focus and publicity ranges are important for getting picture.
“Whereas composing your picture, faucet on the display on the level the place you need your focus to be, and a yellow sq. will seem to indicate you the main focus level,” he mentioned. “This additionally units the publicity.”
When you place your focus, you possibly can drag your finger as much as improve the publicity (brightening the picture) or right down to lower it (making it darker).
The main target of your picture is the primary topic, so no matter whether or not you’re taking a photograph of a sundown, a waterfall or an individual, you’ll wish to make it possible for’s what the attention naturally is drawn towards. In accordance with the rule of thirds above, you must place your focus someplace close to the decrease, higher, left or proper third of your picture.
McMillan identified that you could additionally lock your focus and publicity on the Digital camera app, which is particularly useful for “these instances when chances are you'll wish to obtain [your] focus, then transfer the digicam to recompose your picture with out having to fret about refocusing.”
To do that, faucet and maintain the main focus level, and the yellow sq. will flash a few instances on the high of the display. Then, a yellow indicator will seem with the phrases “AE/AF LOCK” to indicate you the main focus and publicity are locked in place.
3. Contemplate the wide-angle lens
Maria Perez, a senior video producer at B&H Photograph Video, discovered by her expertise that perspective and composition can actually make or break a photograph.
“Cell cameras have so many nice options that assist with framing your composition,” she mentioned.
On the iPhone, the wide-angle lens (the 0.5x perspective choice you see every time you open your digicam) will help you seize a topic super-broadly.
Portrait mode, which could be discovered by swiping as soon as after the Photograph choice on the backside of the Digital camera app, lets you seize pictures with a pointy deal with the topic and a blurred background.
Each of those built-in composition choices assist with altering perspective and depth of subject.
Goodrich additionally famous that it’s necessary to keep away from capturing too many issues in your picture. “Go away empty or unfavorable area round your topic,” she mentioned. “Give your topic room within the picture.”
4. Use burst mode for group pictures (and dwell mode, too)
Apart from the comparatively apparent portrait and cinematic modes out there within the Digital camera app, McMillan recommended taking part in round with different choices, like burst mode or dwell pictures.
Burst mode was initially designed to assist customers take motion pictures by capturing a multi-shot sequence of 1 scene. Nevertheless, McMillan famous it’s a fantastic instrument for taking group pictures, too. He suggested turning on the operate that permits you to use burst mode by hitting your telephone’s volume-up button, which lets you extra simply entry burst mode within the second.
“This must be turned on in the identical Digital camera settings app. Go to Settings, [then] Digital camera, and toggle on ‘use quantity up for burst,’” he mentioned. With this enabled, you possibly can take burst pictures simply by clicking the volume-up button on the left facet of your iPhone.
Dwell pictures are one other enjoyable digicam characteristic. They seize every part that occurs 1.5 seconds earlier than and after you are taking the picture.
There are three decisions for enhancing dwell pictures, McMillan defined:
- Loop: “Your dwell picture will play like a video for the three second period, then hold repeating itself.”
- Bounce: It “will play the video however on the finish of the three seconds, it can go in reverse to the start and hold repeating the method.”
- Lengthy publicity: That is “the most well-liked alternative, and [is] usually used when taking a dwell picture of [things like] shifting water as a result of it can give it that clean, veiling look that a number of photographers like when capturing waterfalls.”
5. Use the magic wand instrument
There are a number of totally different changes out there within the enhancing suite of Pictures. The magic wand “auto” instrument particularly is a superb place to begin, because it makes use of synthetic intelligence to find out the very best settings for the picture.
“When you faucet the wand, you’ll see the place a few of the icons have been adjusted,” McMillan mentioned. “If their respective features have been decreased, the circle reveals how a lot it has been moved, and if the operate was elevated, the circle and the quantity inside it turns yellow.”
He additionally famous that these default settings are a great way to mess around with iPhone enhancing.
“You'll be able to experiment with every adjustment by choosing it and sliding your finger forwards and backwards whereas watching the picture to see the way it modifications the look of it,” he defined. “[If you] undergo all of them to search out your favourite changes, you’ll have the ability to undergo an edit fairly shortly.”
6. If at first you don’t succeed, use the straighten operate
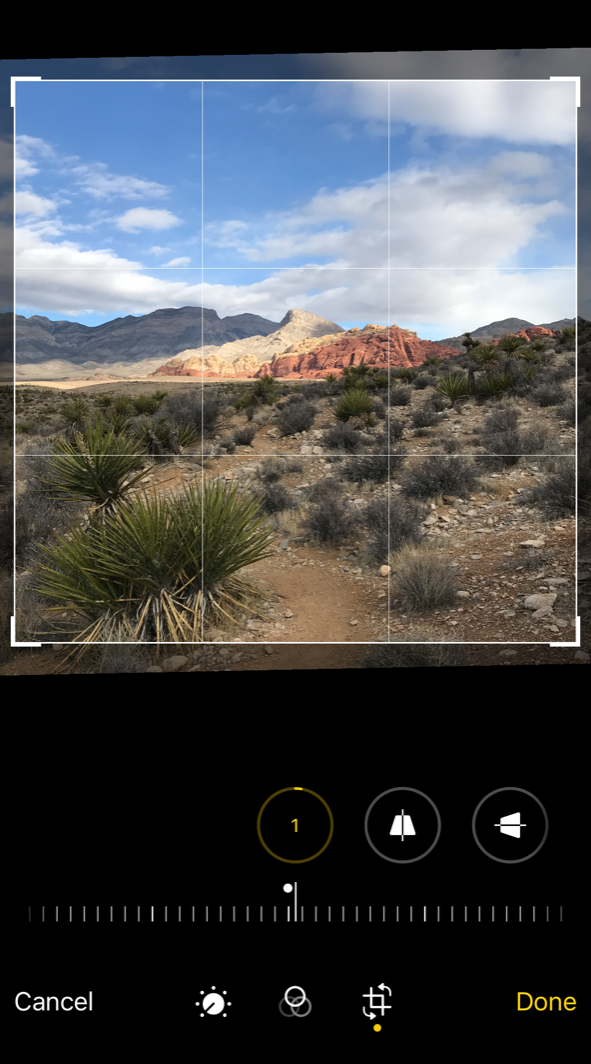
Even with the grid operate on whilst you’re taking a photograph, it might be tough to get a picture that’s completely straight. Good factor there’s a setting for that!
Inside the changes situated beneath your image after you click on “edit,” you possibly can straighten your picture by tapping on the third setting (the field with the arrows going round it). From there, you possibly can swipe left or proper to shift the attitude a sure means. The opposite two choices inside the straighten adjustment will let you skew the picture both vertically or horizontally.
“That is efficient when taking photos of buildings or tall timber the place it's your decision them to look much less skewed,” McMillan mentioned.
7. Modify the publicity, highlights and shadows
Though there are pre-made filters out there to make use of on the Pictures app, Perez has discovered that “it’s greatest to make use of the totally different toggles supplied to essentially customise the look you’re going for.” She famous that, since not all pictures are created equal, one filter gained’t match every part.
To extend or lower the publicity, slide to the second setting out there beneath the adjustment instrument. Relying on the place you’re beginning along with your picture, you possibly can lighten or darken it a contact, however keep away from adjusting it too a lot. “It's because it might decrease the standard of your picture and make it grainy,” Perez mentioned.
Highlights, in the meantime, are the fourth toggle on the adjustment bar. The highlights in a picture are the lightest colours, and rising the vary of highlights and shadows (the darkest components) could make a photograph look extra dynamic. You'll be able to darken the highlights by sliding left or lighten them by sliding proper.
Lastly, shadows, that are fairly actually the areas the place there’s an absence of sunshine, can contribute to better distinction in your picture. To fiddle with this operate, slide to the fifth adjustment within the toolbar. Just like the highlights choice, slide left to darken your shadows or proper to lighten them.
“Publicity, highlights and shadows are what actually brings out probably the most of your picture, no matter what you’re utilizing,” Perez mentioned.
Backside line: Experiment, get to know your tech and take a number of photos.
Above utilizing any enhancing or digicam instrument out there on the iPhone, one of the best ways to take nice photos is to experiment.
“Take numerous pictures,” McMillan really helpful. “You'll be able to all the time delete those you don’t like — within the digital age, we don’t have to fret about utilizing a restricted provide of movie [like in] the outdated days. The extra you shoot, the higher you’ll get.”
McMillan additionally suggested utilizing social media and images platforms like Flickr, Unsplash and Glass as sources of inspiration.
“You could end up drawn to a sure fashion of picture, so [you can] observe these photographers and ask them how they took or edited them,” he mentioned. “The cell images group is full of people that need to be taught extra and people who find themselves pleased to show and assist.”

Post a Comment